The Setup tab in the Cisco Webex Education Connector customizes your preferences...
- If you cannot see the Cisco Webex module in your course Navigation go to Settings>Navigation> and drag it up from the hidden area to the visible area and click Save.
- In the Setup tab of this new Cisco Webex module choose your features (choose one, two or all three). Check the features that you want to be available for your course and select Apply. Then, each feature you selected appears as its own tab.
- Classroom Collaboration (connects to your Webex Teams), If this is checked, then after the semester the Webex Team should be archived after the semester.
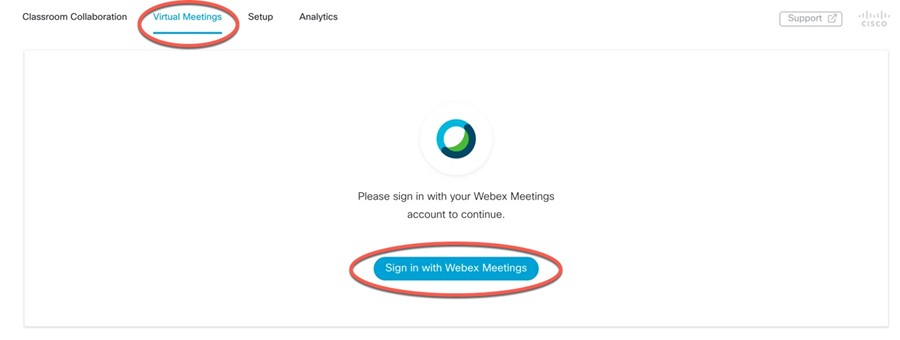
- Virtual Meetings (connects to your Webex Meetings),
- Office Hours (connects to your Webex Personal Room) are all disabled by default.
.
- Authorize with LMS (required) – Authorize the Cisco Webex Education Connector before you start to use its features. Enter the same credentials you use to sign in. This is a one time Canvas authorization that will remain active for all your courses and sandboxes.
- Webex Meetings Attendance Grading (optional)- You can award participation points to students automatically when they attend a meeting or class using the Webex Education Connector. Turn on attendance grading by selecting Turn on.
- Reminder Bot (optional)- The Reminder Bot posts a message into the Webex Teams space before a Webex meeting is about to start for that class or meeting. Select Turn On and select the amount of time before your class you’d like the reminder to be sent.
Available Features
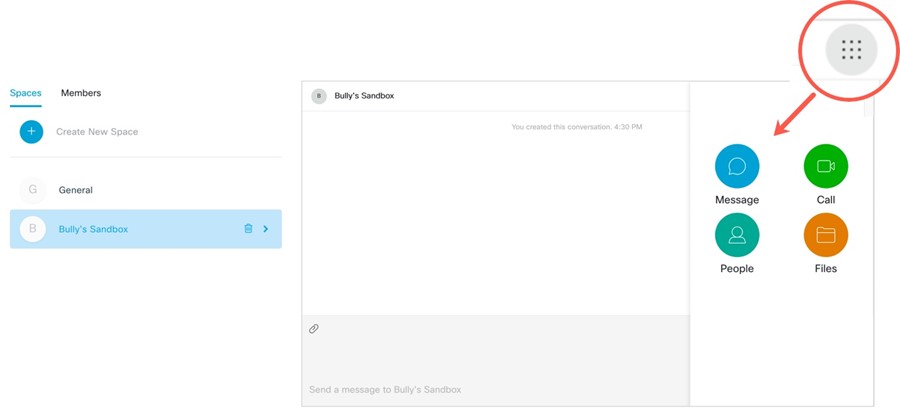
Classroom collaboration links to your Webex Teams account and is an easy way to message a student, and have students message you or each other. Chat in new spaces with a group and share files you’re collaborating on.
Virtual Meetings links to your online Webex Meetings account and you can schedule a recurring or one-time meeting with your students or other instructors.
Office Hours links to your Webex Personal Room and used to schedule and host office hours. The dates and times are available under the Office Hours tab. You can select a time where your students can meet with you.
Classroom Collaboration
NOTE: There might be a delay as the system builds your space. Wait until you see the class Team name at the top, and your General space under Spaces.
It automatically creates a Team with your course name and a General space with everyone already added. The Members column lists everyone in that space.
If you are setting up Classroom Collaboration for breakout rooms it’s recommended to use the Webex Teams app directly as opposed to the Canvas Module.
Virtual Meetings
- Sign in when prompted. If you don’t see the Sign In to Webex Meetings button you might already be signed in. Try creating a New Meeting and see if that prompts you to sign in again. If not you are all set.
-
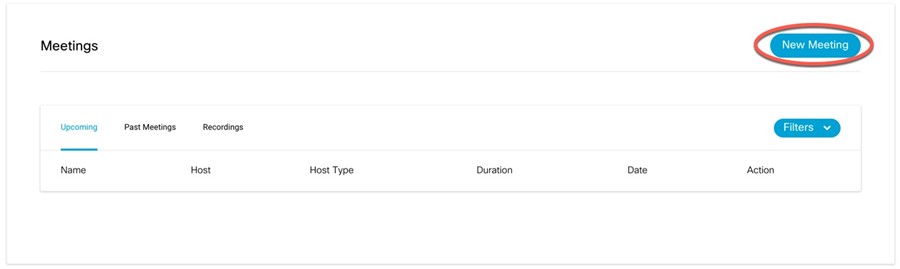
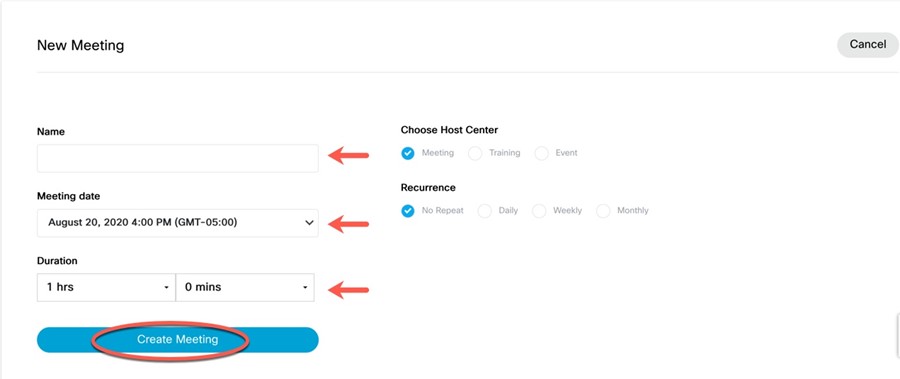
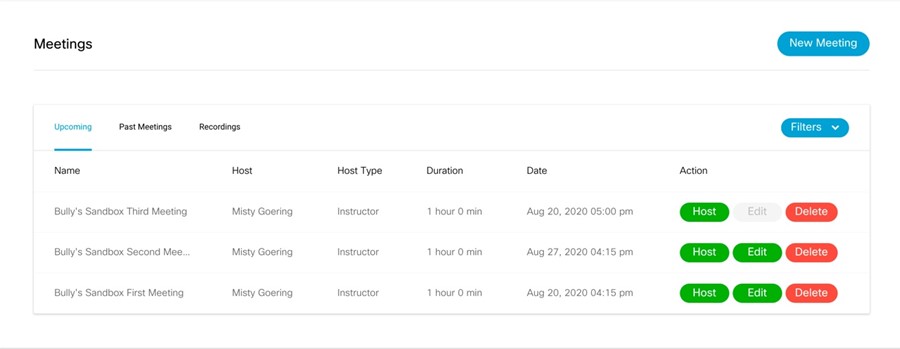
Schedule and Start meetings - Select the +New Meeting button and schedule your meeting with the usual date and time information, creating any needed recurrences.
-
It’s important that you start your meetings in the Cisco Webex app for the recordings to appear in Recordings tab. If you start your meetings elsewhere (your desktop app for instance) the recording will not appear in the Recordings tab but will be available under Recordings in your Webex online account. Recordings may take a few hours to overnight to become available.
-
Start your meeting by pressing the HOST button. Notice below that you cannot edit a meeting with recurrences. Changes made to these same meetings in your online account are not synced back to Canvas. Creating everything here in Canvas for your course keeps the students immediately up-to-date.
Office Hours (setup for instructor only)
You can schedule and host office hours using the Webex Education Connector. The dates and times are available under the Office Hours tab. You can select a time where your students can meet with you.
- Set the meeting duration. Go to the drop-down under Availability and select 15 mins increments, 30 mins increments, 45 mins increments, or 60 mins increments.
- Set the appointment buffer. Go to the drop-down under Block Off Extra Time and select 15 mins before & after, 30 mins before & after, 45 mins before & after, or No buffer.An appointment buffer is there in case meetings run over or you need breaks between meetings.
- Select the days of the week and the times you want to host office hours. The blocks of time are then highlighted.
- Scroll down and select Save.
- Your students can then select a time to meet with you. You get an email with the meeting link and see the meeting in your Upcoming Meetings list. When a student selects a time to attend office hours, that appointment isn’t available to anyone else.